

Well nuts and rivnuts both create a threaded mounting point when a standard nut cannot be placed behind the panel, but they produce very different joints. A well nut uses a flexible rubber body for cushioning and vibration isolation, while a rivnut creates a rigid metal thread in thin or hollow material.
What Is the Difference Between a Well Nut and a Rivnut?
| Selection Factor | Well Nut | Rivnut |
|---|---|---|
| Body construction | Rubber or elastomer body with a threaded metal insert | Internally threaded metal body |
| How it grips | Rubber compresses and bulges behind or within the mounting material | Metal body deforms behind the panel and clamps it between the bulge and flange |
| Best quality | Vibration isolation, cushioning, and potential sealing | Rigid, reusable threads in thin or hollow material |
| Relative load capability | Generally lower and more dependent on the elastomer | Generally higher, subject to the insert and parent material |
| Installation tool | Normally installed while tightening the attachment bolt | Normally requires a rivet-nut setting tool |
| Removal | Usually removable after the bolt is removed | Usually drilled out if the insert itself must be removed |
| Typical automotive use | Windshields, trim, fairings, light covers, and delicate panels | Brackets, access panels, enclosures, and accessories mounted to sheet metal |
Quick answer: Choose a well nut for a compliant, isolated light-duty joint. Choose a rivnut for a firm threaded anchor. Do not choose either solely by thread size or appearance.
What Is a Well Nut?
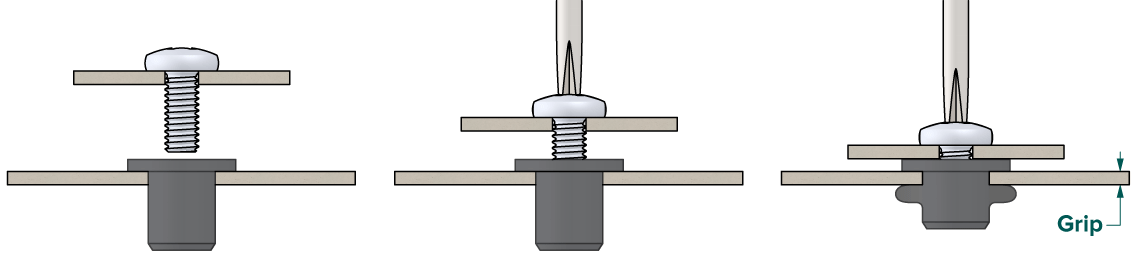
A well nut, sometimes called a rubber expansion nut, has a flanged elastomer body surrounding a threaded insert, commonly made from brass or stainless steel. It pushes into a correctly sized hole from the accessible side. As the bolt is tightened, the insert is drawn toward the flange and the rubber body compresses to create the retaining bulge.
The rubber body can isolate vibration and reduce direct contact between the attachment and the parent panel. It can also act as a gasket around the hole when the fastener, material, and installation are appropriate. Treat sealing as application-specific rather than assuming every well-nut joint will be waterproof.
JDC rubber well nuts are a practical choice for light-duty automotive panels, widebody components, trim, and covers that benefit from a cushioned attachment. The M5 and M6 options allow the insert to be matched to compatible JDC hardware, but the hole diameter, panel thickness, elastomer exposure, and required clamping force still need to match the installation.
Advantages of Well Nuts
- Vibration and noise isolation: The flexible body helps decouple the attached component from the mounting panel.
- Gentler clamping: The compliant body can reduce concentrated stress on plastic, fiberglass, and other delicate surfaces.
- Simple blind installation: Rear access and a dedicated setting tool are normally unnecessary.
- Sealing potential: A properly selected and installed well nut can help seal the hole against moisture, air, and contaminants.
- Serviceability: Many well nuts can be removed and replaced after the bolt is backed out.
Limitations of Well Nuts
- Lower mechanical performance: The rubber body generally provides less pull-out, push-through, and shear capability than a properly installed metal rivnut.
- Material aging: Heat, chemicals, ultraviolet exposure, and time can harden, swell, crack, or otherwise degrade an elastomer.
- Limited positional rigidity: The flexibility that isolates vibration also allows more movement than a rigid metal insert.
- Torque sensitivity: Overtightening can damage the rubber body or threaded insert. Follow the fastener manufacturer's guidance.
Best Uses for Well Nuts
Well nuts are most useful for relatively light components that benefit from cushioning or isolation. Common examples include motorcycle windshields and fairings, interior trim, instrument panels, light covers, small access panels, and accessories mounted to plastic or fiberglass.
They are not a default choice for seats, belts, suspension parts, recovery points, roll protection, or other safety-critical and structural loads.
What Is a Rivnut?
A rivnut is an internally threaded blind insert, also called a rivet nut, threaded insert, or nutsert. It is installed entirely from the accessible side of a thin panel or hollow section. A setting tool pulls on the internal thread while supporting the head, deforming the body behind the panel and clamping the insert in place.

After it is set, the rivnut remains in the panel and accepts a removable bolt. Rivnuts are available in aluminum, steel, stainless steel, and other materials, with round, splined, knurled, or hexagonal bodies and several head styles. Those details affect installation effort, corrosion behavior, load capacity, and resistance to spinning in the hole.
JDC stainless steel rivnuts create a rigid threaded mounting point where a plastic clip or unthreaded panel hole needs to accept removable hardware. They work well in compatible metal panel and bracket locations where corrosion resistance and repeatable service matter, provided the hole size, grip range, setting tool, bolt length, and surrounding material are correct.
Advantages of Rivnuts
- Reusable internal thread: The attached part can be removed and reinstalled without reaching behind the panel.
- Rigid mounting point: A properly set rivnut creates a firmer joint than a flexible well nut.
- Useful in thin and hollow sections: Rivnuts add threads where the parent material is too thin to tap directly.
- Broad configuration range: Body, head, material, and thread options can be matched to the panel and expected load.
Limitations of Rivnuts
- Installation requirements: Consistent results normally call for the correct mandrel and a rivet-nut setting tool.
- No inherent vibration isolation: A rigid metal insert does not provide the cushioning of a well nut. A separate isolator or gasket may be needed.
- Possible spin-out: An oversized hole, incorrect grip range, smooth body, soft panel, or poor setting can allow the insert to rotate.
- More involved replacement: A damaged or spinning rivnut generally has to be carefully drilled out.
- Corrosion considerations: The insert, bolt, panel, coatings, moisture exposure, and galvanic compatibility must be considered together.
Best Uses for Rivnuts
Rivnuts suit removable brackets, undertrays, access covers, equipment enclosures, light-duty engine-bay accessories, and similar parts attached to sheet metal or tubing. The acceptable use depends on documented fastener performance, the strength and condition of the parent material, edge distance, hole quality, and load direction.
For structural or safety-critical work, use an attachment method specified or approved by a qualified engineer or the vehicle manufacturer.
Automotive Applications That May Use Either Fastener
Some automotive mounting jobs can use either a well nut or rivnut, but the choice changes how the joint behaves. A widebody panel mounted to fiberglass or another delicate surface may benefit from the cushioning of a well nut. The same panel attached to a suitable metal fender or quarter panel may need the firmer reusable thread of a correctly installed rivnut.
JDC titanium widebody and panel hardware can be configured around well nuts or rivnuts so the mounting method follows the panel material instead of forcing one insert into every location. It is a good choice for exposed panel hardware because the titanium bolt and washer create a coordinated finish while the selected insert controls the attachment behind the panel.
JDC Titanium Widebody & Panel Hardware (Universal)
How to Choose the Correct Fastener
1. Define the Load and Required Joint Behavior
Start with the forces the attachment will see, including tension, shear, vibration, impacts, and any prying load caused by an offset bracket. If controlled movement and cushioning are desirable, a well nut may be appropriate. If the component needs a rigid mounting surface and a reusable thread, a rivnut is usually the stronger candidate.
Compare manufacturer data rather than assuming every fastener of the same thread size has the same capacity.
2. Identify the Parent Material
Sheet thickness, hardness, brittleness, surface coating, and access all affect the choice. A well nut can be friendly to delicate plastics and composites because it spreads load through a flexible body. A rivnut can work in sheet metal, composites, and some plastics, but its body style and setting force must suit the material.
Thin or soft panels may need a larger flange, an appropriate insert design, reinforcement, or a different fastening method.
3. Match Hole Size and Grip Range
The hole is part of the fastener system. Use the diameter specified for the exact insert, drill cleanly, and deburr without unnecessarily enlarging the opening. For a rivnut, the rated grip range must include the actual combined panel thickness. An insert that is too short may not clamp correctly, while one that is too long may not deform as intended. Well nuts also have specified hole sizes and usable material ranges.
The SAE and metric thread checker helps identify the existing male or female thread before a replacement bolt, well nut, or rivnut is selected. It is useful when similar thread diameters and pitches are difficult to distinguish by eye, but the tool does not replace measuring the insert body, hole diameter, grip range, bolt length, or head geometry.
Nut & Bolt Thread Checker for SAE & Metric Hardware
4. Consider Environment and Service Life
Check temperature, water, road salt, fuel, oil, cleaners, and ultraviolet exposure. Select a well-nut elastomer compatible with the environment. For rivnuts, consider the insert and bolt materials, protective finishes, and the possibility of galvanic corrosion where dissimilar metals meet.
If sealing is required, confirm that the complete joint design provides it. An open-end rivnut alone is not a sealed connection.
5. Plan for Future Service
Think about how often the attached part will be removed and what happens if the insert is damaged. A well nut is easy to replace but has a more flexible, lower-capacity connection. A rivnut supports repeated bolt removal, but cross-threading or spin-out can make repair more time-consuming.
Use the correct bolt length so it engages sufficient thread without bottoming in a closed-end insert or contacting components behind the panel.
How Much Weight Can Well Nuts and Rivnuts Hold?
How Much Weight Can Well Nuts Hold?
There is no universal weight rating for a well nut. Its capacity changes with the well nut's size, elastomer, threaded insert, hole diameter, material thickness, mounting surface, temperature, age, and whether the load acts in tension, shear, or at an angle.
A well nut that works for a lightweight trim panel may not be suitable for a heavier bracket even when both use the same thread size. Use the manufacturer's pull-out and shear data for the exact well nut and parent material. If no load data is available, treat it as a light-duty fastener rather than estimating its capacity from bolt size.
How Much Weight Will a Rivnut Hold?
A rivnut also does not have one universal weight rating. Its usable capacity depends on the insert material, body shape, thread size, grip range, installation quality, parent-panel material, edge distance, and load direction. The panel or hole can fail before the rivnut itself reaches the strength of its internal thread.
Use manufacturer pull-out, push-out, spin-out, shear, and thread-strength data for the exact insert installed in a comparable material. Published test values are not automatically the same as a safe working load, especially where vibration, impact, fatigue, or occupant safety is involved.
Do not convert a fastener's thread size into a weight rating. The insert, installation, panel, load direction, and required safety factor all affect the complete joint.
PEM Nut vs Rivnut and Other Alternatives
What Is Better, a PEM Nut or Rivet Nut?
A self-clinching PEM-style nut is often better for a planned sheet-metal assembly when both sides are accessible during manufacturing and a press can apply the specified squeezing force. The surrounding ductile sheet flows into the nut's undercut, while the clinching ring provides resistance to rotation.
A rivnut is usually better for a finished panel, hollow section, tube, or retrofit where installation must be completed entirely from one side. It requires a setting tool but does not require the panel to be placed between a press and anvil.
| Choose a PEM-Style Nut When... | Choose a Rivnut When... |
|---|---|
| The joint is being designed into a new sheet-metal part | The insert must be installed from only one accessible side |
| The sheet material and hardness are compatible with self-clinching installation | The application is a retrofit, repair, hollow section, or assembled panel |
| A press and correctly supported installation tooling are available | A hand, lever, pneumatic, or powered rivnut tool is more practical |
| A flush, production-ready threaded feature is required | Blind installation and a wide range of body styles are the priorities |
What Is Better Than a Rivnut?
No single fastener is always better than a rivnut. A through-bolt with a washer and locking nut may provide a simpler and stronger connection when both sides are accessible. A welded nut can suit a permanent fabricated metal assembly. A self-clinching nut can be better for production sheet metal, while a plus nut or other expanding insert may provide a larger backside footprint in certain thin or soft materials.
The better option depends on access, panel material, required strength, serviceability, vibration, sealing, installation equipment, and whether the joint is structural. For a safety-critical attachment, use the method specified by the vehicle manufacturer or a qualified engineer rather than selecting an alternative by convenience alone.
How to Install a Well Nut
- Confirm the well nut's thread size, body diameter, hole specification, and environmental compatibility.
- Drill or prepare a clean hole to the manufacturer's specified diameter, then remove burrs and debris.
- Push the well nut fully into the hole so its flange rests flat against the surface.
- Place the attachment over the well nut and thread in the correct bolt by hand.
- Tighten only as directed. The rubber body should compress and form a retaining bulge without tearing, twisting, or being crushed excessively.
Do not use a generic torque value. The correct torque depends on the well nut, thread, elastomer, attachment, and parent material.
How to Install a Rivnut


- Select an insert whose material, body style, head, thread, and grip range match the application.
- Prepare the manufacturer-specified hole. Keep the tool square to the surface and deburr the opening.
- Thread the rivnut fully and straight onto the correct tool mandrel.
- Insert it until the head sits flat against the panel.
- Operate the tool according to its instructions. Use the correct stroke or setting force so the body clamps without being under-set or over-set.
- Unthread the mandrel and inspect the result. The insert should be seated flat and should not rotate when the attachment bolt is installed to its specified torque.
For JDC M6 rivnut applications, the manual M6 setting tool provides the correct threaded mandrel in a compact design operated with an Allen key and open-end wrench. It is a good option for occasional panel or clip-replacement work where a larger lever or pneumatic tool is unnecessary, as long as the tool is kept square and the insert is set to the required clamp without being crushed.
Installation tip: Test the insert, hole size, tool adjustment, and grip on scrap material of the same type and thickness before modifying a finished panel.
How Do You Stop a Rivnut From Spinning?
The best way to stop a rivnut from spinning is to prevent the loose installation that causes it. Use the manufacturer's specified hole diameter, select a grip range that includes the actual panel thickness, choose a body style suited to the material, and set the insert with the correct tool force or stroke.
A knurled, splined, half-hex, or full-hex body can provide greater resistance to rotation than a smooth round body when the panel and hole can accept that design. Full-hex inserts generally require a matching hexagonal hole, while knurled round inserts can improve grip in a correctly sized round hole.
If a newly installed rivnut is loose but undamaged, it may have been under-set and could require additional setting according to the insert and tool manufacturer's instructions. Do not continue tightening blindly because an over-set insert can damage the panel, threads, or mandrel.
If the rivnut spins with a bolt already installed, avoid forcing the bolt until the surrounding panel tears. It may be possible to hold the flange temporarily while removing the bolt, but a damaged insert normally needs to be drilled out and replaced. Inspect the hole before installing another rivnut. An enlarged or distorted hole may require a larger compatible insert, a different body style, panel repair, reinforcement, or another fastening method.
Threadlocker does not repair an oversized hole or incorrectly set rivnut. It may help keep a properly installed attachment bolt from loosening when appropriate for the application, but it is not a substitute for mechanical retention between the insert and panel.
Common Selection and Installation Mistakes
- Using a well nut as a structural anchor: Its flexibility and lower mechanical performance make it unsuitable for many critical loads.
- Estimating capacity from thread size: Load performance depends on the entire insert, panel, installation, and load direction.
- Ignoring grip range: Thread size alone does not determine whether a rivnut fits the panel.
- Drilling the hole too large: Excess clearance can reduce retention and allow either fastener to spin.
- Using the wrong rivnut body: Smooth, knurled, splined, and hex bodies provide different resistance to rotation.
- Under-setting a rivnut: An incomplete backside bulge can leave the insert loose in the panel.
- Over-setting a rivnut: Excess tool force or stroke can damage the insert, mandrel, or parent material.
- Overtightening a well nut: More torque does not automatically produce a stronger joint and can damage the elastomer.
- Assuming the joint is sealed: Verify the insert design and complete assembly when water or vapor exclusion matters.
- Overlooking access behind the panel: Check for wiring, hoses, moving parts, and required clearance before drilling.
Key Takeaways
| If Your Priority Is... | Start With... | Verify Before Installation |
|---|---|---|
| Vibration isolation or cushioning | Well nut | Load, elastomer compatibility, and tightening guidance |
| Potential sealing around a light-duty mount | Well nut | Hole size, flange contact, and complete joint sealing |
| A rigid reusable thread in thin material | Rivnut | Grip range, hole size, body style, and setting force |
| A production thread in compatible sheet metal | PEM-style self-clinching nut | Sheet hardness, thickness, hole size, press force, and access |
| Higher mechanical performance | Rivnut or an engineered alternative | Manufacturer load data and parent-material strength |
| A structural or safety-critical attachment | Specified engineered fastener | Vehicle-manufacturer or qualified-engineer approval |
Related JDC Guides
Compare well nuts, rivnuts, threaded inserts, and compatible mounting hardware for automotive and fabrication projects in the nuts and threaded inserts collection.


